|
Wiring the Hub telephone socket to house
wiring
Your existing house wiring (if you have more than one socket in the
premises) will be connected to a Network Terminating Point socket i.e. the first one, which is
called a master socket or NTE. This socket is owned by the provider and will
have a removable plate on the front. Your house wiring connects to
this removable plate. As this wiring is not connected to the new
hub it has effectively been made redundant. But - it can be connected to the back of
the hub if required.
Even if you are line only, the existing Master Socket may
be used to supply the service and in this case the internal wiring will
still have to be removed, as the line signal has been changed to a data
type.
If you wish to connect your house wiring to the hub then the house wiring
MUST be disconnected from the master socket (NTE). This is essential
and if you do not feel confident about this then call an expert.
Do not
just plug a cable into the front socket on the Master Socket and the other
end into the telephone socket in the back of the Smart Hub!
Remember that you are responsible for the internal
cabling. BT will charge you if they attend site and a fault is found
on the internal cable!
To connect the house wiring to the Hub it is advisable to
obtain a secondary telephone socket (Line Jack Unit No. 2/3A) and a
connecting cord that is plug ended at both
ends.
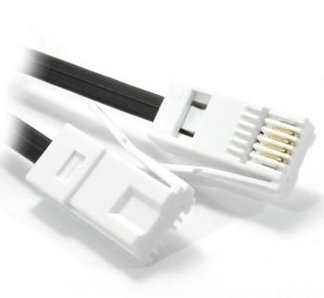
The plug ended cord must have the plugs
reversed and this is correct. See the picture below - check the ridge
in the cable. This cord is available to two lengths from a company
called Kenable (2
metres - code No.
007633, 1 metre - code No.
006529).
Most sockets, like the one mentioned above (2/3A), require a
special wire inserter tool but Kenable can supply a master
Line Jack Unit No. 2/4A (code No.
004629) socket which has screw terminals. If you do not have the
special wire inserter tool then it is advisable to purchase the screw type
socket.
The parts above can be purchased from many suppliers and
this web site has no connection with Kenable.
 |
 |
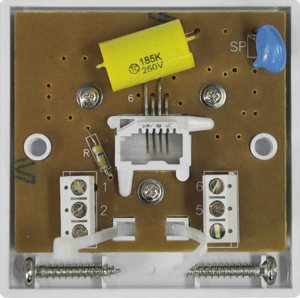
Line Jack Unit No. 2/4A - Code No. 004629
The yellow, blue and stripy components would
need to be removed |
Connecting Cord - Code No. 007633 |
Connecting the existing house wiring to the new Smart
Hub
Overview
These instructions advise on removing the internal telephone wires from the
master socket and connecting it to a new socket. A cord is also
required to connect the new socket to the hub.
-
Make sure that you have dial tone on the Smart Hub
telephone socket - found on the rear of the hub.
-
Remove from the new socket the yellow, blue (SP) and
stripped (R) components - us a pair of cutters and discard the
components.
-
Fix the new socket back box next to the existing
master socket (NTE).
-
Remove
the front plate from the existing master socket (NTE).
-
Disconnect the house cable from the
front plate making a note of which colour wires are connected to which
terminals - they are numbered.
-
Pull the house cable out of the
original NTE socket and
connect to your new master socket ensuring that the same wire colours are
connected to the same numbered terminals.
-
Refit the Master socket (NTE) front plate. This
will no longer by used as a telephone socket.
-
Now connect the new extension cable between the
socket on the rear of the hub and the newly installed house wiring
socket.
-
All your original sockets
should now have dial tone.
Please note that the Smart Hub may not have enough power
to ring all your telephones
in which case switch some of the ringers to Off.
If your wiring does not work then disconnect the socket
and test the smart hub socket for dial tone.
This part is for those more technically
minded
It advises of a more complicated method of connection
A telephone line cord can be connected directly to the
rear the screw type socket. In this case the cord must be constructed
with stranded wires or the connection will probably fail.
Not all cords use the same colour wires so you need to
check your cord against the picture below. The picture shows a
standard BT cord and as the cord is flat, having a ridge on one side only,
it is easy to see the wire layout and then work out which wires go where.
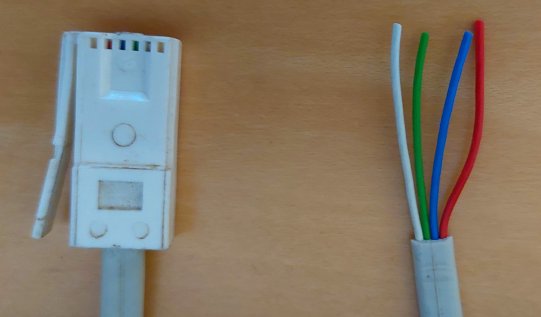
Connections for a standard BT cord are shown in the table
below.
| BT standard cord wires |
Connect to socket terminals |
| White |
5 |
| Green |
4 |
| Blue |
3 |
| Red |
2 |
Cord to Socket wiring table
Connecting the existing house wiring to the new Smart
Hub
Overview
These instructions advise on removing the internal telephone wires from the
master socket and connecting it to a new socket. A cord is also wired
to the new socket which will connect to the hub.
-
Make sure that you have dial tone on the Smart Hub
telephone socket - found on the rear of the hub.
-
Remove from the new socket the yellow, blue (SP) and
stripped (R) components - us a pair of cutters and discard the
components.
-
Fix the new socket back box next to the existing
master socket (NTE).
-
Remove
the front plate from the existing master socket (NTE).
-
Disconnect the house cable from the
front plate making a note of which colour wires are connected to which
terminals - they are numbered.
-
Pull the house cable out of the
original NTE socket and
connect to your new master socket ensuring that the same wire colours are
connected to the same numbered terminals.
-
Refit the Master socket (NTE) front plate. This
will no longer by used as a telephone socket.
-
Now cut the female socket off the extension cord.
Leave the BT plug on the other end.
-
Strip back the outer sheath of the cord about 4
inches exposing the four coloured wires.
-
Strip back the insulation of each wire about half an
inch.
-
Insert the the cord into the new back box and connect
the four wires as shown in the table above. If the colours are
different or in different positions then use the picture above to
resolve what socket terminals to use.
-
Fix the new socket onto the new back plate.
-
Connect the plug on the new cord into the back of the
hub.
-
Plug a telephone into the newly installed socket and
you should hear dial tone.
-
All your original sockets
should now have dial tone.
Please note that the Smart Hub may not have enough power
to ring all your telephones
in which case switch some of the ringers to Off.
If your wiring does not work then disconnect the socket
and test the smart hub socket for dial tone.
|